DISCOVER&RECOVER NEW RECIPES

Monday, March 8, 2010

1st EXPERIMENT-PUMPKIN CAKE

Assalamualaikum...

Before the task;

On 24th February 2010, Wednesday in kitchen A, Block A, UNITAR. This is our 1st class in experimental food using our own idea. Our idea was to us pumpkin in making cakes. We choose the recipe of Banana Cake but substituted banana with pumpkin. We started our class with 'Al-Fatihah'. Before we can start our experiment, we were given a short briefing.

Ingredients;
  • 250 g Butter
  • 175 g Castor sugar
  • 3 nos Eggs
  • 1 tsp Vanilla essence
  • 240 g Self raising flour
  • 190 g Pumpkin(cooked and mashed)
  • 1 tsp Lemon juice
  • 3/4 cup Milk

Method;
  1. Preheat oven to 160’C. Grease the sides and base and line a loaf pan with parchment paper.
  2. Beat butter, sugar and vanilla essence until light and creamy.
  3. Add in eggs one at a time beating well after addition.
  4. Beat in the mashed pumpkin and lemon juice. Mix well the blend.
  5. Fold in the flour to mix.
  6. Pour mixture into prepared pan and bake in preheated oven for an hour or until cooked.

During the task;

After briefing, as usual we did our first step which was to preheat oven and then prepared the ingredients for pumpkin cake. Done with the ingredients, we started with a few steps to prepare the pumpkin as the ingredient in our cake. We peeled, cut, cleaned, boiled until tender, drained and mashed the pumpkin.


*The process of peeling, cutting and cleaning the pumpkin*


*The pumpkin after being cleaned*


*The process of boiling the pumpkin until it became tender*


*The tender pumpkin after being boiled*


*The process of tossing the cooked pumpkin*


*The process of mashing the pumpkin*


We prepared two types of mixture for pumpkin cake, without milk and with milk added. Both cake mixture being baked into preheated oven.


*Ingredients*


*Steps in making preparing the pumpkin cake mixture*


*Pouring out the mixture into prepared loaf pan*


*On the left, mixture without milk. On the right, mixture with milk added*


*The cake mixture being baked into preheated oven*


After the task;

*The ready baked pumpkin cake*


*Pumpkin cake without milk*


*Pumpkin cake with milk added*


Recommendation & Conclusion;

We concluded that cake without milk turned out to be very dry and if milk is added, the cake became more moist and softer in texture. However from the recipe used, the cake lacks of pumpkin aroma and did not taste so much of pumpkin.

The following chart 1.1 shows the result of our experiment.

*CHART 1.1 (click pic to enlarge)*

Sunday, February 28, 2010

EXPERIMENT-FRUIT LEATHER

Assalamualaikum...

Before the task;

On 10th February 2010, Wednesday in kitchen A, Block A, UNITAR. It was our third class and last class for our experimental foods by following the compilation of notes and exercise that have be given to us on our first week of class. On the next class, we are going to start our experimental foods by our own ideas. We started our class with 'Al-Fatihah'. Same as last week, we were given a short briefing about our last experimental food, Fruit Leather. Our task for that day was to experiment with fruit by following the basic formula and procedures.

BASIC FORMULA- FRUIT LEATHER

Ingredients;
  • 2 1/2 cup Strawberries, hulled and cut in half
  • 25 g Sugar

Method;
  1. Puree strawberries in blender until smooth. Stir in the sugar.
  2. Line jelly roll pan with parchment paper and fasten it to the edges with masking tape. Spread the fruit evenly in the pan.
  3. Dry in oven at 140'F (60'C) until completely dry and no longer sticky (approximately 12 hours).
  4. Remove from wax paper and roll up. Wrap the roll tightly in aluminum foil and store at room temperature in tightly closed plastic bag or container.
Note; Apple leather can be made using 1 1/2 1b of apples (peeled, cored and pureed), 90ml water, 75g sugar and 0.8g cinnamon.

There are two procedures for fruit leather.

Procedure;

1. Fruit Leather
a. Control--- Prepare the basic formula. Note the time required to dry.
b. Honey, 140'F (60'C) oven--- Prepare basic formula, but substitute 30 ml honey for the sugar. Dry in oven at 140'F. Note the time required to dry.

All groups were assigned to do procedure 1.(a) and 1.(b) but with different types of fruits. There were five fruits, peach, strawberry, kiwi, apple and dragon fruit. Our group was given peach.

During the task;

After briefing and explanation were done, as usual we did our first step which was to preheat oven and then prepared the ingredients for Fruit Leather. Done with the ingredients, we started our experiment by following the recipe method and the procedure that had been given to us. Two from four of us made fruit leather using sugar while the other two made fruit leather using honey.


*the fruit leather was baked in the oven*

This experiment took a long time for the fruit leather to be baked until dry.

After the task;

After the fruit leather was dry, we peeled it from the parchment paper. Then we presented our result to the class. After discussion and comments from our chef, we prepared our records.


As usual, before we ended our class lesson, we cleaned our kitchen and made sure that everything was in a good condition.

Recommendation & Conclusion;

The following chart 12.2.3 shows the result of our experiment.

*CHART 12.2.3 (click pic to enlarge)*

Friday, February 19, 2010

EXPERIMENT-GLUTEN BALL & BREAD

Assalamualaikum...

Before the task;

On 3rd February 2010, Wednesday in kitchen A, Block A, UNITAR. It was our second class. We started our class with 'Al-Fatihah'. Same as last week, we were given a short briefing about our second experimental foods, Bread(Wheat Gluten and Yeast Breads). Our task for that day was to experiment with Wheat Gluten and Yeast Breads by following the basic formula and procedure.

BASIC FORMULA-GLUTEN BALL

Ingredients;
  • 110 g (1 c) Flour
  • 60 ml Water
Method;
  1. Use a fork to stir the dough that forms as the water is added to the flour. Add only enough water to make a stiff dough.
  2. Use less than the amount indicated if the dough can be worked without adding all 60 ml. Add more than 60 ml if necessary to make the dough. Record the exact amount of water used.
  3. After the water is added, knead the dough vigorously for 5 minutes, but without adding more flour.
  4. Place the ball in a strong muslin cloth. Hold the wrapped ball under a slow stream of cold water and manipulate the ball to begin to wash the starch from the dough.
  5. If the water looks cloudy or milky, there is still starch in the ball. Patiently continue the process until the water runs clear as it drains from the cloth.
  6. When the water begins to look clear, open the cloth and scrape the cream-colored scraps together. Also, gather together any cream-colored particles that may be in the sink or on the outside of the cloth. This cream-colored material looks insignificant, but it is gluten.
  7. When the starch has been washed away completely, the gluten mass will be quite cohesive and worked into a ball. Additional washing can be done without the cloth to eliminate any pockets of white starch that may be visible as the gluten is manipulated.
  8. It is imperative that all the starch be removed because starch will interfere with optimal expansion of the gluten ball during baking.
  9. Before baking the gluten balls prepared in the class,class members should manipulate the various types to experience their elasticity and cohesiveness.
  10. Then the balls should be weighed. After weighing, bake the balls on pieces of foil in ovens preheated to 232'C (450'F).
  11. After baking 15 minutes, turn the temperature to 150'C (300'F) and continue baking another 30 minutes without opening the oven door. Cool briefly before weighing and measuring the volume. Cut in half to reveal the interior structure.


Procedure;

1. Type of flour--- Using the flour assigned, prepare 1 gluten ball, according to the basic formula.
a. All purpose flour--- Prepare the basic formula using all purpose flour. This flour will serve as the control against which the others will be assessed.

b. Cake flour--- Prepare the basic formula using cake flour.

c. Pastry flour--- Prepare the basic formula using pastry flour.


d. Bread flour--- Prepare the basic formula using bread flour.

Experiment with wheat gluten was given to group one. Our group and other groups were given experiment with yeast bread.

BASIC FORMULA-BREAD

Ingredients;
  • 7 g (1 pkg) Yeast,dry
  • 118 ml (1/2 c) Water at 35'C
  • 4 g (1 tsp) Shortening
  • 6 g (1 1/2 tsp) Sugar
  • 3 g (1/2 tsp) Salt
  • 200 g (1 7/8 c) All purpose flour
Method;
  1. Add yeast to 59 ml water after being certain that the water temperature is 35'C (95'F). Barely melt the shortening. Place sugar, salt and remaining 59 ml water in a mixing bowl and add the shortening and then the yeast-water mixture. Stir with wooden spoon. Gradually begin adding the flour while mixing slowly with wooden spoon.
  2. Add just enough flour to make a very soft paste. Beat with the wooden spoon and then adding just enough flour to make a smooth, non sticky, rather soft dough.
  3. Knead the dough on a bread board by folding the far edge of the dough to meet the front edge and pushing firmly with the heel of both hands before rotating the dough 90' and repeating the process until 100 kneading strokes have been completed.
  4. Very lightly coat dough with oil. Rest the dough until it become to double size and cover with a aluminum foil or wet towel.
  5. Punch dough down after estimating the volume of the risen dough. Shape the dough into a load and place in a greased loaf pan 5 3/4" x 3 1/2" x 2". Very lightly coat dough with oil.
  6. Let rise until double in volume. Meanwhile preheat the oven to 220' (425'F).
  7. Bake for 15 minutes (until bread sounds hollow when tapped). Remove from pan immediately and cool on a wire rack.

Procedure;

1. Amount of kneading

a. No kneading--- Prepare the basic formula, but do not knead the dough at all. Simply prepare it for rising and proceed according to the basic formula.

b. 50 strokes kneading--- Prepare the basic formula, but knead the dough only 50 times. Proceed according to the basic formula.

c. 100 strokes (control)--- Prepare the basic formula. This is control loaf for judging all the variations.

d. 200 strokes kneading--- Prepare the basic formula, but knead the dough 200 times. Be sure to maintain the same kneading technique and pressure throughout the process.

e. 500 strokes kneading--- Prepare the basic formula, but knead the dough 500 times. Be sure to maintain the same kneading technique and pressure throughout the process.

2. Amount of flour
a. Too little flour--- Prepare the basic formula, but reduce the weight of flour to 160 g. If the dough is too soft to knead, simply knead it in the bowl with a spoon. Proceed with the rising according to the basic formula.

b. Excess flour--- Prepare the basic formula, but have a weighed amount of flour available during the kneading process. Work as much of this flour as possible into the dough during the kneading process. This is done by generously and frequently adding flour to the board. Weigh the flour remaining after kneading to determine the total amount of flour in dough. Note how the handling characteristics changed during kneading as more flour was worked in.

3. Type of liquid.
a. Milk--- Prepare the basic formula, using milk in place of the water.

Our group was given procedure number 1.(a) and 1.(b).

During the task;

After briefing and explanation were done, as usual we did our first step which was to preheat oven and then prepared the ingredients for Bread. Done with the ingredients, we started our experiment by following the recipe method and the procedure that had been given to us. Two from four of us made bread without kneading while the other two made bread with 50 strokes kneading.

Ingredients


*pic1&pic2-method*

*pic1*


*pic2*


*pic 3&4-dough was rested for a while*

*pic3*


*pic4*


*everyone seems so busy*


*after had been rest for 2nd time*


*ready to bake*


*while waiting for the bread to bake, we fried some hotdogs and 'jemput-jemput'*


After the task;


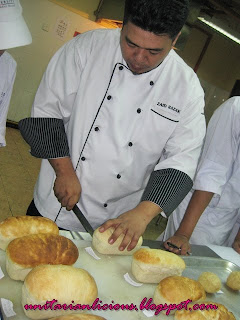
*bread without kneading*


*bread with 50 strokes kneading*


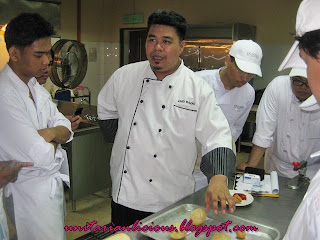
When everything was done, we presented our bread to discuss the finding of our result for each procedure in this experiment. We evaluated and made comparisons and then wrote out our records for each procedure.


*The following photo shows, the discussion between Chef Zaid and us*


As usual, before we ended our class lesson, we cleaned our kitchen and made sure that everything was in a good condition.

Recommendation & Conclusion;

From our experiment and comparisons, we concluded that the best procedure in making the bread was by using 100 strokes kneading. It was found that without kneading and 50 strokes kneading did not show excellent results.

The following chart 9.1 & 9.2 shows the result of our experiment.

*CHART 9.1 (click pic to enlarge)*

*CHART 9.2 (click pic to enlarge)*
 

Blog Template by YummyLolly.com